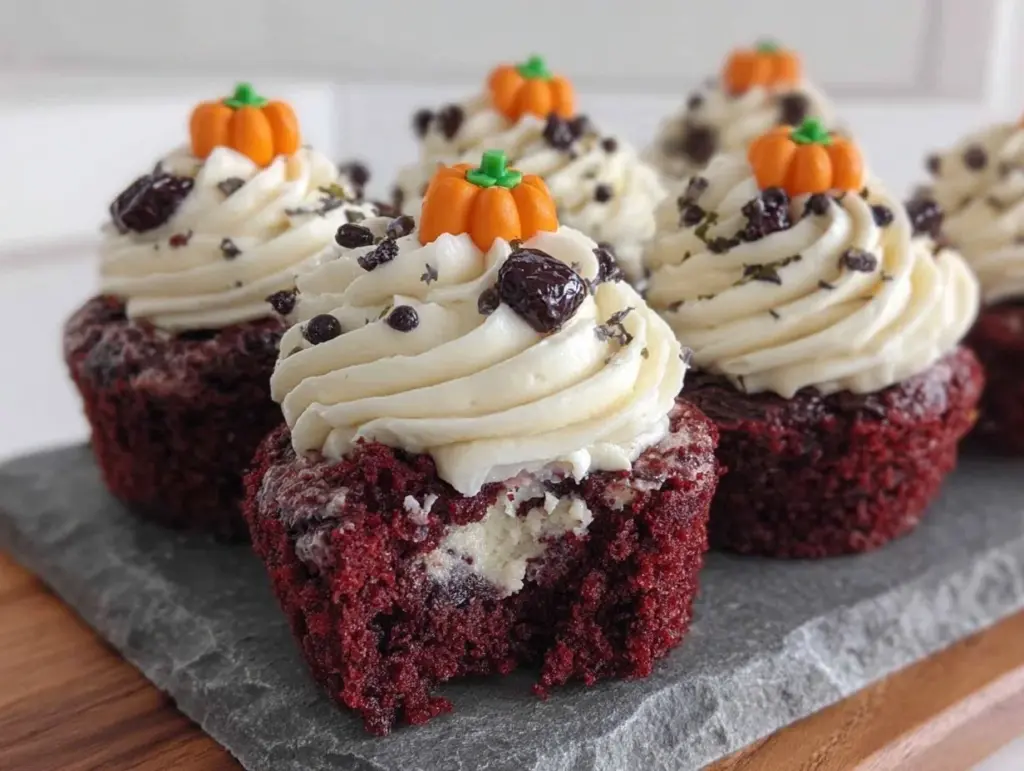
There is a very specific kind of chaos that happens when you hand a 7-year-old a bowl of purple batter. It’s not the messy, “I-made-a-mess-and-I-don’t-care” kind of chaos. It’s the wide-eyed, “Is this supposed to be this color?” kind of chaos. Last week, I watched my son carefully stir a batch of vibrant purple cupcake batter with the intensity of a surgeon, convinced he was creating magic. When he looked up at me, his hands stained slightly violet, and asked if we could eat the spoon, I realized something important.
We finally found the baking project that doesn’t feel like a chore for us or a lesson in patience for him. These Halloween purple velvet cupcakes with cream cheese frosting are the answer to the eternal question: “How do I get my kids to actually *want* to help in the kitchen?” Spoiler alert: It involves bright colors, simple mixing, and frosting that tastes better than it looks.
I’ve tried everything from no-bake energy bites (too crumbly) to complex layered cakes (too much intimidation factor). But this purple velvet recipe? It’s the sweet spot. It’s forgiving. It’s colorful enough to make Halloween feel magical, but simple enough that a kid can handle the heavy lifting. I’ve made these three times in the last month, and each time, the kids are more engaged than the last. They measure, they mix, they sprinkle (okay, they sprinkle *way* too many sprinkles, but that’s part of the fun), and they eat with genuine pride. If you’ve been looking for a dessert that doubles as a bonding activity, stop scrolling. This is it.
Why You’ll Love This Purple Velvet Recipe
Look, I’m not going to pretend that baking with kids is always picture-perfect. It’s usually flour on the floor and batter on the ceiling. But these cupcakes are different. They’re designed for small hands and big imaginations. Here’s why this has become our go-to Halloween tradition:
It’s a Sensory Dream — The batter changes color as you mix in the food coloring. Watching white batter turn into deep, rich purple is pure magic for kids. It’s visual, it’s tactile, and it keeps them focused. I’ve seen my usually restless 5-year-old stand at the counter for 20 minutes straight, just watching the color swirl. It’s mesmerizing.
Kids Can Actually Help — Most baking recipes require precision that frustrates little ones. This one? You dump, you stir, you pour. The kids can handle the dry ingredients, they can crack the eggs (with supervision, obviously), and they can definitely handle the mixing. I let my kids use the hand mixer on low speed. It’s safe, it’s fun, and it makes them feel like real bakers. If you’re looking for other easy baking projects, check out our brown butter chocolate chip cookies for a simpler option, but these cupcakes are where the real fun is.
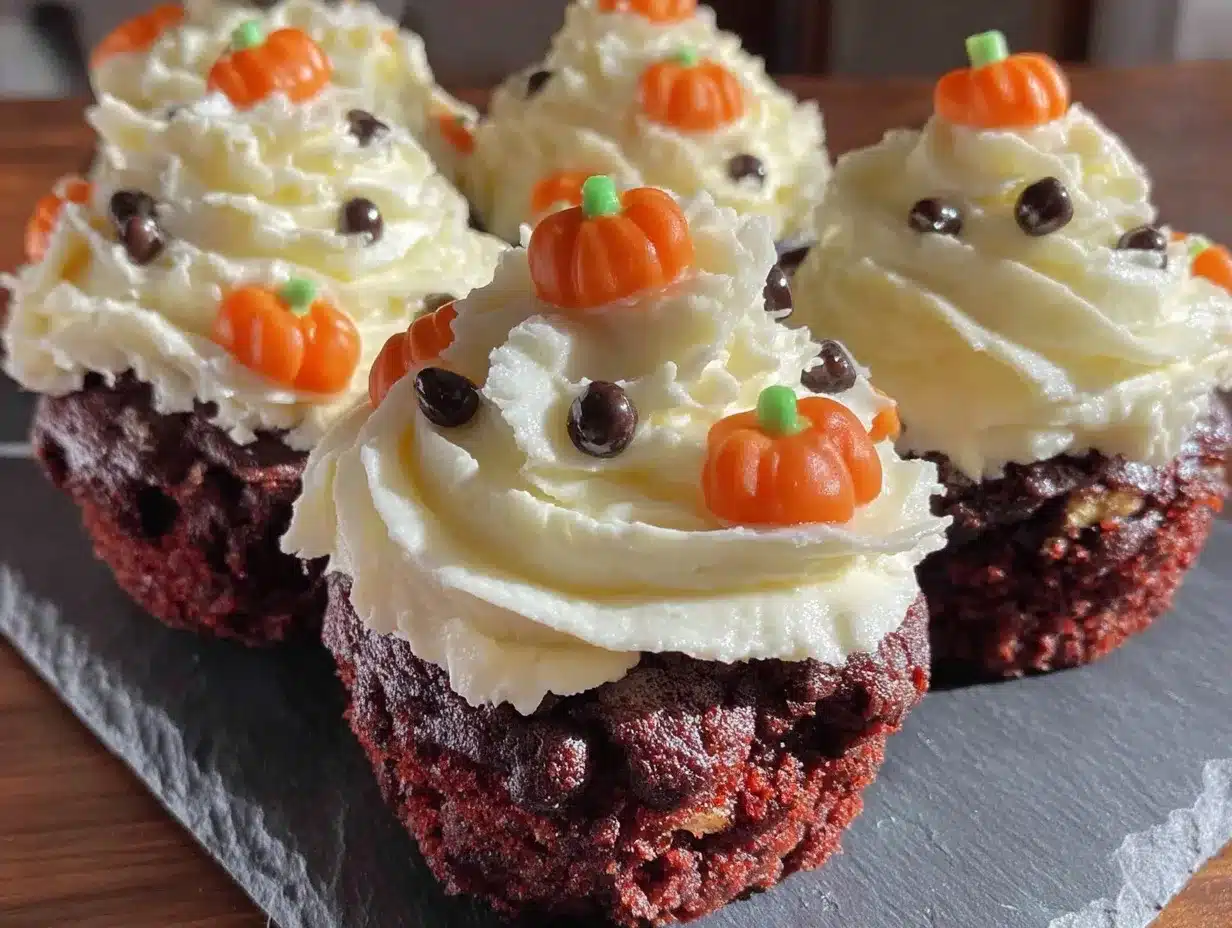
The Frosting is the Star — Let’s be honest. The purple cake is fun, but the cream cheese frosting is what they’re really here for. It’s tangy, sweet, and perfect for decorating. This is where the creativity comes in. Ghosts? Pumpkins? Little purple monsters? It’s up to them. And honestly, the frosting is so good that I often eat it straight off the spoon before the cake even cools. I’ve tried bakery-style strawberry buttercream before, but this cream cheese version is richer and pairs perfectly with the velvet texture.
It’s Not Too Sweet — I’m picky about dessert. I don’t want something that’s just sugar water. The “velvet” part of the name comes from the buttermilk and vinegar reaction, which gives the cake a tender, moist crumb that isn’t overly sweet. It balances the sweet frosting perfectly. My kids love sweets, but they don’t get that sickly-sweet feeling afterward. It’s a win-win.
Halloween Ready in One Bowl — Unlike some complicated recipes that require ten different bowls and a lot of prep, this is surprisingly straightforward. You don’t need fancy equipment. You don’t need to be a professional baker. You just need a bowl, a whisk, and some patience. It’s the kind of recipe that makes you feel accomplished, even if you’re burning the house down (kidding… mostly).
Ingredients You’ll Need
Here’s the best part: you probably have most of this already. I’m not asking you to hunt down exotic ingredients that cost more than the cake itself. This is pantry-friendly baking. Here’s what you need to make this magic happen.
For the Purple Velvet Cake
All-purpose flour (2 ½ cups / 315g) — The base. Don’t use self-rising unless you adjust the leavening. I use Gold Medal flour because it’s consistent. If you’re looking for a one-bowl banana bread vibe, this flour works similarly for dry mixing.
Baking soda (1 ½ teaspoons) — Essential for the rise. Make sure it’s fresh. If it’s been in your cabinet since 2019, toss it. It won’t work.
Baking powder (1 teaspoon) — Helps the cupcakes puff up nicely.
Salt (½ teaspoon) — Balances the sweetness. Don’t skip it.
Unsalted butter (1 cup / 2 sticks / 226g, softened) — Room temperature is key. If it’s cold, it won’t cream properly. Softened means you can press your finger into it and leave a mark, but it shouldn’t be melted.
Granulated sugar (1 ½ cups / 300g) — Standard white sugar. Brown sugar can be used for a deeper flavor, but white keeps that classic velvet look.
Eggs (2 large, room temperature) — Again, room temp. Cold eggs can curdle your butter mixture. Crack them into a small bowl first to check for shells.
Vanilla extract (2 teaspoons) — Real vanilla, please. The fake stuff tastes chemical, and in a simple cake, you’ll taste it.
Buttermilk (1 cup / 240ml) — This is the secret to the “velvet” texture. If you don’t have buttermilk, make your own: add 1 tablespoon of white vinegar or lemon juice to a measuring cup, then fill with milk to the 1-cup line. Let it sit for 5 minutes. It curdles. That’s good.
Red and Blue food coloring gel (or liquid) — To get purple, you mix red and blue. I use gel coloring because it’s more potent and doesn’t add extra liquid. If you use liquid, you might need a few extra drops. Aim for a deep, rich purple. Not pastel. Not neon. Think “witch’s brew” purple.
For the Cream Cheese Frosting
Cream cheese (8 oz / 226g, softened) — Full-fat block cream cheese. Not the spreadable kind in a tub. That has too much moisture and will make your frosting runny.
Unsalted butter (½ cup / 1 stick / 113g, softened) — Again, room temperature.
Powdered sugar (3-4 cups / 360-480g) — Sifted if it’s lumpy. You’ll need about 3 cups for a softer frosting, 4 cups for stiffer frosting that holds shapes for decorating.
Vanilla extract (1 teaspoon) — For flavor.
Salt (a pinch) — Cuts the sweetness.
Equipment Needed
You don’t need a fancy kitchen for this. Here’s what I actually use, and what you can swap.
Cupcake pan (12-cup) — Standard size. I have a non-stick one that’s seen better days, and it works perfectly. If you don’t have one, a muffin tin works too.
Cupcake liners — Black or purple liners look great for Halloween. Or go classic white. I like black because the purple pops against it.
Mixing bowls — One large bowl for wet ingredients, one medium for dry. I use a set of glass bowls because I can see what’s happening.
Electric mixer — Hand mixer or stand mixer. Hand mixer is fine, but it takes a few more minutes of arm workout. I use my hand mixer because it’s faster to clean.
Whisk — For mixing the dry ingredients and the buttermilk mixture.
Measuring cups and spoons — Standard stuff. I have a set from IKEA that’s cheap and durable.
Cooling rack — Essential for cooling the cupcakes before frosting. If you frost warm cupcakes, the frosting will melt. Don’t skip this step.
Piping bags or ziplock bags — For decorating. I cut the corner off a ziplock bag to make a makeshift piping bag. It works great for kids.
How to Make It: Step-by-Step
Alright, let’s make this! I’m walking you through exactly how I do it, including the little tricks I’ve picked up over the years. Remember, this is about having fun with the kids, so don’t stress if it’s not perfect. Imperfect cupcakes taste just as good.
Step 1: Prep Work (10 minutes)
Preheat your oven to 350°F (175°C). Line your cupcake pan with liners. I usually let the kids do this—it’s like playing with building blocks. While the oven heats, get out all your ingredients. Bring the butter and cream cheese to room temperature. If you forget, microwave the butter for 10 seconds and the cream cheese for 15 seconds. Don’t melt them! Just soften them.
Step 2: Mix the Dry Ingredients (5 minutes)
In a medium bowl, whisk together the flour, baking soda, baking powder, and salt. I let my kids do this part. They love whisking. It’s rhythmic and satisfying. Make sure there are no lumps of baking soda. If you see white clumps, whisk more. This step is usually done while the oven preheats.
Step 3: Cream the Butter and Sugar (3-4 minutes)
In a large bowl, beat the softened butter and sugar together on medium-high speed until it’s light and fluffy. This takes about 3-4 minutes. I let the kids take turns with the mixer on low, then I crank it up to high. You’ll know it’s ready when the mixture looks pale and airy. This step adds air to the cake, which makes it tender.
Step 4: Add Eggs and Vanilla (2 minutes)
Add the eggs one at a time, beating well after each addition. Then add the vanilla. Scrape down the sides of the bowl with a spatula to make sure everything is incorporated. The mixture might look slightly curdled—that’s okay. It will come together with the buttermilk.
Step 5: Combine Wet and Dry (3 minutes)
Reduce the mixer speed to low. Add the dry ingredients in three parts, alternating with the buttermilk in two parts. Start and end with the dry ingredients. Mix until *just* combined. Do not overmix! Overmixing makes the cake tough. The kids can help add the ingredients, but I do the final mixing to ensure it’s not overdone.
Step 6: Add the Purple Color (1 minute)
Now for the fun part. Add your red and blue food coloring. I use about 1 teaspoon of red and 1 teaspoon of blue gel coloring. Mix until the batter is a uniform purple. If you want it darker, add more color. If you want it lighter, add a little more batter. Let the kids decide the shade. They’ll be proud of their color choice.
Step 7: Bake (18-20 minutes)
Divide the batter evenly among the cupcake liners. I use an ice cream scoop for this—it’s faster and ensures even baking. The kids love scooping. Bake for 18-20 minutes, or until a toothpick inserted into the center comes out clean. If it has wet batter on it, bake for 2 more minutes. Don’t overbake, or they’ll be dry.
Step 8: Cool Completely (30 minutes)
Let the cupcakes cool in the pan for 5 minutes, then transfer them to a cooling rack to cool completely. This is the hardest part. The kids will want to eat them now. Tell them to wait. If you frost them warm, the frosting will melt into a puddle. Patience is key.
Step 9: Make the Frosting (10 minutes)
While the cupcakes cool, make the frosting. Beat the softened cream cheese and butter together until smooth. Gradually add the powdered sugar, one cup at a time, beating on low speed. Add vanilla and salt. Beat on high for 2 minutes until fluffy. If it’s too soft, add more powdered sugar. If it’s too stiff, add a teaspoon of milk.
Step 10: Decorate (20+ minutes)
This is the best part. Let the kids frost the cupcakes. Use a knife, a spoon, or a piping bag. Make ghosts, pumpkins, or just swirls. Add sprinkles, candy eyes, or orange dragees. Let their creativity run wild. There are no wrong answers here.
Expert Tips & Tricks
Here’s everything I’ve learned from making these dozens of times. These tips will save you from my mistakes.
Room Temperature is Non-Negotiable
I can’t stress this enough. Cold butter and cream cheese will result in lumpy batter and frosting. If you’re short on time, soften them in the microwave for 10-15 seconds. But don’t melt them. Melted butter makes greasy cupcakes.
Don’t Skimp on the Buttermilk
The acid in the buttermilk reacts with the baking soda to create those tiny air bubbles that make velvet cake so tender. If you skip it, you’ll just have a regular chocolate cake (minus the chocolate). Make your own buttermilk if you have to. It works perfectly.
Use Gel Food Coloring
Food coloring gel is more concentrated than liquid. You need less of it, so you don’t throw off the batter’s consistency. Liquid coloring can make the batter too wet. If you only have liquid, use a bit more, but expect a slightly softer batter.
Cool Completely Before Frosting
I know, I know. It’s hard. But if you frost warm cupcakes, the frosting will slide off. It’s a mess. Use this time to let the kids draw or play. The cupcakes will still be there when they’re done.
Store Properly
These cupcakes are best eaten the same day, but they’ll keep in an airtight container at room temperature for up to 2 days. If your kitchen is hot, store them in the fridge. Bring them to room temperature before serving. The frosting will firm up in the fridge, so let it sit out for 15 minutes before eating.
Variations & Substitutions
Once you’ve nailed the basic version, here’s how you can mix it up. I’ve tried all of these.
Orange Velvet
Skip the red and blue food coloring. Use orange food coloring instead. Add 1 teaspoon of orange extract to the batter and frosting. It’s like a pumpkin spice cupcake without the pumpkin. Great for Thanksgiving.
Green Velvet (Monster Theme)
Use green food coloring. Add a teaspoon of mint extract to the frosting. Top with candy eyes. These are perfect for “monster” themes. My kids love making little green monsters with frosting.
Gluten-Free Option
Use a 1-to-1 gluten-free flour blend. The texture will be slightly different, but it still works. I’ve used Bob’s Red Mill blend, and it’s good. Make sure your baking powder is gluten-free.
Dairy-Free Option
Use dairy-free butter and dairy-free cream cheese. There are good brands out there, like Miyoko’s or Kite Hill. The frosting might be slightly softer, so add more powdered sugar. The cake will still be moist if you use dairy-free buttermilk (soy milk + vinegar).
Mini Cupcakes
Fill mini cupcake liners 2/3 full. Bake for 12-14 minutes. Great for party favors. The kids love these because they’re bite-sized. Less waste, more fun.
Serving & Storage
How to Serve
I usually serve these straight from the plate at the dinner table. They look rustic and festive. But here are other ways I’ve enjoyed them:
- Party Platter — Arrange them on a tiered stand. Add some candy corn around them for extra Halloween flair.
- After-School Snack — Pair with a glass of cold milk. It’s a classic combo.
- Trick-or-Treat Reward — Give one to each kid after they come back from trick-or-treating. It’s a nice way to end the night.
Storage Instructions
Refrigerator: Store in an airtight container for up to 4 days. The frosting will firm up, so let them sit at room temperature for 15 minutes before eating.
Freezing: These freeze well! Freeze the unfrosted cupcakes first. Wrap them tightly in plastic wrap, then foil. They’ll keep for 2 months. Thaw overnight in the fridge, then frost. The frosting doesn’t freeze as well because it can separate. Make fresh frosting when you’re ready to eat.
Reheating: You don’t need to reheat these. They’re best at room temperature. If you’re in a hurry, microwave for 10 seconds to soften the frosting. Don’t overdo it.
Nutrition Information
I’m not a nutritionist, but here’s the breakdown if you’re tracking. This is a treat, so enjoy it guilt-free.
Per Serving (based on 12 cupcakes):
- Calories: 380
- Protein: 4g
- Carbs: 52g
- Fiber: 1g
- Sugar: 40g
- Fat: 16g
- Saturated Fat: 10g
- Cholesterol: 55mg
- Sodium: 220mg
What’s Good:
- Decent protein from the eggs and cream cheese.
- Calcium from the cream cheese and milk.
What to Know:
- Higher in sugar due to the frosting and cake.
- Contains dairy and gluten.
My Take:
Look, these are cupcakes. They’re supposed to be sweet. It’s Halloween. You’re not going to eat these for breakfast. But they’re homemade, so you know exactly what’s in them. No weird preservatives. Just flour, sugar, butter, and fun. When I want to make them lighter, I reduce the sugar in the frosting by half a cup, but honestly? I rarely do. Life’s too short for half-sugar frosting.
Final Thoughts
So that’s my go-to Halloween purple velvet cupcakes! I’ve probably talked your ear off at this point, but when you make a recipe this often, you have a lot to say about it. This has saved our Halloween baking tradition. It’s my answer to “what do we bake together?” when I’m tired, don’t want to buy store-bought, and still want something that tastes really good. My kids are happy, I’m happy because I’m not stressed about cooking, and we spent quality time together in the kitchen.
Make it yours! Try different colors, swap in your favorite candies, adjust the frosting thickness. The best recipes are the ones you adapt to your family’s tastes. If you make this, drop a comment and let me know what you think! I love hearing how recipes turn out in your kitchen. And if something doesn’t work, tell me that too—I’m here to help troubleshoot.
Happy baking! And I hope your kitchen smells half as good as mine does right now.
Frequently Asked Questions
Can I use liquid food coloring instead of gel?
You can, but you’ll need a lot more of it. Liquid coloring adds extra water to the batter, which can throw off the texture. If you use liquid, start with 2-3 drops of red and 2-3 drops of blue, then add more until you get the shade you want. Gel coloring is more potent, so you only need a small amount. I recommend gel if you can find it.
My cupcakes turned out dry—what happened?
Usually, this means they were overbaked. Check them at 18 minutes. If a toothpick comes out clean, they’re done. If it has wet batter, bake for 2 more minutes. Also, make sure you’re measuring your flour correctly. If you scoop the flour directly from the bag, you’re using too much. Spoon the flour into the measuring cup and level it off. This is a common mistake that leads to dry cakes.
Can I make these ahead for a party?
Yes! Bake the cupcakes a day ahead. Let them cool completely, then wrap them tightly in plastic wrap. Store them at room temperature. Make the frosting the day of. This way, the frosting is fresh and fluffy. If you frost them ahead, the frosting might get soft or dry out. Better to frost right before serving.
Why did my frosting separate?
This usually happens if the cream cheese or butter was too warm, or if you beat it too long. Cream cheese frosting is sensitive to heat. If it looks grainy or separated, try beating it on low speed for a minute. If that doesn’t work, add a tablespoon of powdered sugar and beat again. If it’s still broken, you might need to start over with fresh ingredients. Make sure everything is room temperature, not warm.
Can I use self-rising flour?
Not directly. Self-rising flour already has baking powder and salt in it. If you use it, you’ll need to adjust the recipe. Omit the baking soda and baking powder, and reduce the salt to ¼ teaspoon. But I don’t recommend it because the leavening agents in self-rising flour can vary, and you might end up with flat cupcakes. Stick to all-purpose flour for best results.
How do I get the purple color to be vibrant?
The key is to use enough coloring. Velvet cake batter is white, so it takes a lot of coloring to turn it purple. Start with 1 teaspoon of red gel and 1 teaspoon of blue gel. Mix well. If it’s still pinkish, add more blue. If it’s too dark, add a little more batter. Let the kids play with the color. They’ll learn about color mixing, which is a bonus.
Pin This Recipe!
Halloween Purple Velvet Cupcakes: Easy Kid-Friendly Recipe
- Total Time: 50 minutes
- Yield: 12 servings 1x
Description
These Halloween purple velvet cupcakes with cream cheese frosting are a fun, kid-friendly baking project that results in moist, tender cakes with a vibrant purple color and tangy-sweet frosting.
Ingredients
- 2 ½ cups (315g) all-purpose flour
- 1 ½ teaspoons baking soda
- 1 teaspoon baking powder
- ½ teaspoon salt
- 1 cup (2 sticks / 226g) unsalted butter, softened
- 1 ½ cups (300g) granulated sugar
- 2 large eggs, room temperature
- 2 teaspoons vanilla extract
- 1 cup (240ml) buttermilk
- Red and blue food coloring gel (approx. 1 tsp each)
- 8 oz (226g) full-fat block cream cheese, softened
- ½ cup (1 stick / 113g) unsalted butter, softened
- 3–4 cups (360-480g) powdered sugar, sifted
- 1 teaspoon vanilla extract
- Pinch of salt
Instructions
- Preheat oven to 350°F (175°C) and line a 12-cup cupcake pan with liners.
- In a medium bowl, whisk together flour, baking soda, baking powder, and salt.
- In a large bowl, beat softened butter and granulated sugar on medium-high speed until light and fluffy (3-4 minutes).
- Add eggs one at a time, beating well after each addition, then add 2 teaspoons vanilla extract. Scrape down bowl sides.
- Reduce mixer speed to low. Add dry ingredients in three parts, alternating with buttermilk in two parts, starting and ending with dry ingredients. Mix until just combined.
- Add red and blue food coloring gel and mix until batter is a uniform purple color.
- Divide batter evenly among cupcake liners using an ice cream scoop.
- Bake for 18-20 minutes or until a toothpick inserted into the center comes out clean.
- Let cupcakes cool in the pan for 5 minutes, then transfer to a cooling rack to cool completely.
- While cupcakes cool, beat softened cream cheese and ½ cup butter until smooth.
- Gradually add powdered sugar, vanilla, and a pinch of salt, beating on low then high until fluffy.
- Frost cooled cupcakes and decorate as desired.
Notes
Ensure all dairy ingredients (butter, cream cheese, eggs, buttermilk) are at room temperature for best texture. Do not overmix the batter to avoid tough cupcakes. Cool cupcakes completely before frosting to prevent melting. For gluten-free, use a 1-to-1 gluten-free flour blend. For dairy-free, use dairy-free butter and cream cheese alternatives.
- Prep Time: 30 minutes
- Cook Time: 20 minutes
- Category: Dessert
- Cuisine: American
Nutrition
- Serving Size: 1 cupcake
- Calories: 380
- Sugar: 40
- Sodium: 220
- Fat: 16
- Saturated Fat: 10
- Carbohydrates: 52
- Fiber: 1
- Protein: 4
Keywords: Halloween, purple velvet cupcakes, kid-friendly baking, cream cheese frosting, easy dessert, fall baking



