Last year, my sister-in-law decided to host a dinner party for twelve people. It was supposed to be a casual “potluck style” evening, but she had other plans. She wanted to impress. She wanted elegance. She wanted, specifically, tiramisu.
Now, tiramisu is tricky. Real tiramisu requires raw egg yolks (which makes some people nervous), a delicate balance of bitter espresso and sweet cream, and most importantly, time. Like, a lot of time. You need to let it chill for at least six hours, preferably overnight, so the ladyfingers soften and the flavors meld. But my sister-in-law’s party was at 7 PM. It was 4 PM. I was at her house, staring at a kitchen that smelled like roasted garlic and rosemary, wondering how I was going to create a dessert that felt indulgent but didn’t require a two-day commitment.
I looked at the clock. I looked at the ingredients. And I realized that maybe, just maybe, the traditional method wasn’t the only way to get that iconic coffee-and-cream taste.
So I threw together a no-bake tiramisu with mascarpone and espresso layers. No raw eggs. No waiting for the oven to preheat (because, let’s be honest, who has time for that on a weeknight?). I whipped up the mascarpone cream, brewed a strong pot of espresso, and assembled it in big glass bowls. By the time the guests arrived, the dessert was sitting in the fridge, looking gorgeous and tasting like heaven.
Everyone ate two helpings. My sister-in-law asked for the recipe. I’ve been making this no-bake tiramisu ever since. It’s become my secret weapon for busy weeknights when I want to serve something that feels fancy but took me exactly fifteen minutes to put together. It’s perfect for when you’re hosting, or just when you need a little treat after a long day of work.
Why You’ll Love This Weeknight Tiramisu
I know what you’re thinking. “Tiramisu? Isn’t that a project?” Not this version. This recipe has completely changed how I think about dessert. Here’s why I keep making it, and why you will too:
- Zero Baking Required — Seriously. If you can whisk cream and dip a cookie, you can make this. I’ve made this while my toddler was napping (shhh). No oven needed means no heating up the kitchen in the summer, and no waiting for cooling racks.
- Lightning Fast Prep — The actual assembly takes about 15 minutes. The rest is just fridge time. I can start this at 5:30 PM, have it ready to serve by 7:00 PM, and still have time to clean up. It’s the ultimate weeknight hack.
- Make-Ahead Friendly — This is the best part. The longer it sits, the better it gets. I often make this the night before, and the flavors actually deepen overnight. It’s less stressful to have ready than a cake that needs frosting.
- Gluten-Free Option — If you have gluten-free friends (or just want to go GF yourself), this is so easy to adapt. Just swap the ladyfingers for gluten-free ones. The rest of the recipe stays exactly the same.
- Crowd-Pleaser Status — I’ve served this to people who claim they “don’t like coffee desserts.” They always come back for seconds. The mascarpone balances the bitter espresso perfectly. It’s rich but not heavy.
This is my go-to when I need dinner to just work, but I still want to serve something that feels special. No complicated techniques, no weird ingredients, just reliable, delicious food that makes everyone happy.
Ingredients You’ll Need
Here’s the best part: you probably have most of this already. Tiramisu is deceptively simple. It’s not about having twenty obscure spices; it’s about having a few high-quality ingredients and letting them shine.
For the Espresso Layer
Strong brewed coffee or espresso (2 cups / 480ml) — You need this to be strong. If you use weak coffee, the dessert will taste flat. I use a dark roast espresso blend. You can use instant espresso powder mixed with hot water if you’re in a rush, but fresh brewed is better. Let it cool to room temperature before using.
Sugar (2 tablespoons / 25g) — Just a little bit to balance the bitterness of the coffee. You can skip this if you prefer a less sweet dessert, or use a sugar substitute if you’re watching calories. I usually stick with regular white sugar.
Strong liquor (optional) (2-3 tablespoons / 30-45ml) — Marsala wine is traditional, and I love it. But rum or even a splash of vanilla extract works too. If you’re making this for kids or non-drinkers, just skip it. The coffee flavor will still be amazing.
For the Mascarpone Cream

Mascarpone cheese (16 oz / 450g) — This is the star. Don’t substitute with cream cheese. They taste different. Mascarpone is richer, creamier, and less tangy. I buy the tubs, not the blocks, because they’re easier to whip. Make sure it’s cold.
Heavy cream (2 cups / 480ml) — Full-fat heavy whipping cream. This is what gives the tiramisu its fluffy, airy texture. Don’t use half-and-half or light cream; it won’t whip up properly.
Confectioners’ sugar (½ cup / 60g) — Also known as powdered sugar. It dissolves instantly into the cream, so you don’t get any gritty bits. Sift it if it’s clumpy.
Vanilla extract (1 teaspoon / 5ml) — Pure vanilla, not imitation. It adds a warm background note that ties the coffee and cream together.
For the Assembly
Ladyfingers (1 package / about 24-30 pieces) — These are the dry, sponge-like cookies. You need the ones that are crisp enough to dip but not stale. If they’re soft, they’ll disintegrate. I buy the standard Italian brand, but generic works fine too.
Dark chocolate (2 oz / 55g) — For grating on top. Use a bar with at least 60% cocoa. It adds a nice bitter contrast to the sweet cream. I keep a bar of Ghirardelli in the pantry specifically for this.
Equipment Needed
You don’t need fancy equipment for this. Here’s what I actually use:
Large mixing bowl — I use a 5-quart stainless steel bowl. It needs to be big enough to whip the cream without splattering.
Electric hand mixer or stand mixer — Whipping cream by hand is possible, but it takes forever and your arm hurts. A hand mixer is perfect for this. I use my KitchenAid attachment, but any electric mixer works.
Spatula — A rubber spatula is essential for folding the whipped cream into the mascarpone without deflating it. I have a few from IKEA; they’re cheap and work great.
Serving bowls or trifle dish — I like serving this in individual glass bowls because you can see the layers. It looks pretty on Pinterest (and Instagram). But a large trifle dish works if you’re feeding a crowd.
Microplane or grater — For the chocolate. A microplane makes fine, fluffy shavings that melt in your mouth. A box grater works too, but the shavings will be chunkier.
Shallow dish for dipping — I use a pie plate or a wide bowl to pour the espresso into. It needs to be wide so you can dip the ladyfingers quickly without soaking them.
How to Make It: Step-by-Step
Alright, let’s make this! I’m walking you through exactly how I do it, including the little tricks I’ve picked up over the years. It’s simpler than it looks.
Step 1: Brew and Cool the Espresso (10 minutes)
Start by brewing your coffee. I like to make a double batch of espresso so I have enough liquid. Pour it into a heat-safe bowl and stir in the sugar and liquor (if using). Let it sit at room temperature. You don’t need to refrigerate it, but it needs to be cool so it doesn’t melt the mascarpone when you dip the cookies. If you’re in a hurry, put the bowl in the fridge for 20 minutes.
Step 2: Whip the Cream (5 minutes)
In a large, cold bowl, pour the heavy cream. Using your electric mixer, whip on medium-high speed until you get stiff peaks. This means when you lift the beaters, the cream stands up straight. It usually takes 2-3 minutes. Don’t over-whip it into butter, but don’t under-whip it either. You want it firm enough to hold its shape.
Step 3: Prepare the Mascarpone (3 minutes)
In a separate bowl, add the mascarpone cheese, confectioners’ sugar, and vanilla extract. Whip this on low speed just until it’s smooth and combined. Do not over-mix this part. Mascarpone can separate if you whip it too hard. You just want it creamy and lump-free. It should look like thick pudding.
Step 4: Fold the Cream Together (3 minutes)
This is the most important step. Gently fold the whipped cream into the mascarpone mixture. Use your spatula to cut down through the middle and fold over the top. Do this slowly and carefully. You want to keep all that air in the cream. If you mix too vigorously, you’ll deflate it and end up with a dense, heavy dessert. Fold until there are no more white streaks of mascarpone visible. It should look uniform and fluffy.
Step 5: Dip and Layer (10 minutes)
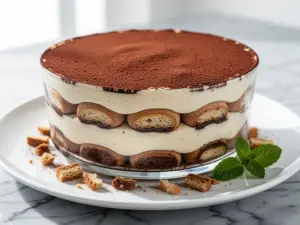
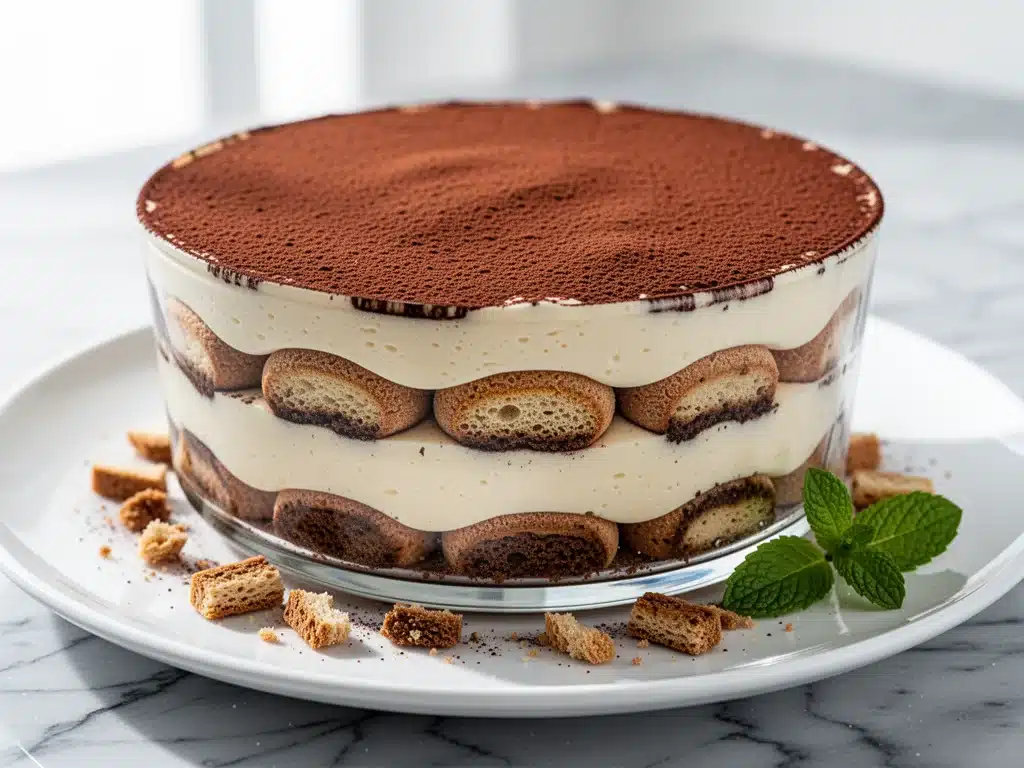
Now for the fun part. Take a ladyfinger and dip it quickly into the espresso mixture. I mean *quickly*. One or two seconds per side. You want it moist, not soggy. If you soak it too long, it will fall apart. Place the dipped ladyfinger in the bottom of your serving dish. Arrange them side-by-side to cover the bottom. You may need to break a cookie to fill gaps.
Spread a thick layer of the mascarpone cream over the ladyfingers. Smooth it out with your spatula. Then, repeat the process: dip another layer of ladyfingers and spread another layer of cream. I usually do two layers of cookies and two layers of cream. Finish with a smooth layer of cream on top.
Step 6: Chill and Garnish (30 minutes to overnight)
Cover the dish with plastic wrap and refrigerate. I recommend chilling it for at least 4 hours, but overnight is best. The cookies need time to soften and absorb the coffee. Before serving, grate the dark chocolate over the top. It’s like a little snowstorm on top of the cream. Slice or scoop it up and serve.
Total Time: About 30 minutes active, plus chilling time.
Expert Tips & Tricks
Here’s everything I’ve learned from making this dozens of times. These tips will save you from my mistakes.
Don’t Soak the Cookies
This is the #1 mistake people make. Ladyfingers are like sponges. If you leave them in the coffee for more than 2 seconds, they will disintegrate into mush. Dip, don’t dunk. You want them moist, not swimming.
Keep Everything Cold
Mascarpone and heavy cream behave better when they’re cold. Take them out of the fridge 10 minutes before you start, but don’t let them warm up. If your kitchen is hot, put your mixing bowl in the fridge for 15 minutes before whipping. It helps the cream hold its peaks.
Use a Heavy Bowl
When you’re folding the cream, use a heavy bowl. If it’s light, it will slide around on the counter while you’re trying to mix. A stainless steel bowl is perfect because it has weight and stays put.
Chop, Don’t Grate (Optional)
If you don’t have a microplane, you can finely chop the chocolate with a knife. It won’t be as pretty, but it tastes the same. I’ve done this when I was too lazy to dig out the grater.
Make Individual Servings
If you’re worried about the layers looking messy, make individual portions in small glass jars or bowls. It’s easier to control the dipping, and it looks adorable. Plus, no one can steal your slice.
Variations & Substitutions
Once you’ve nailed the basic version, here’s how you can mix it up. I’ve tried all of these.
Alcohol-Free Version
Skip the Marsala or rum. Add an extra teaspoon of vanilla extract and a tablespoon of espresso powder to the coffee for extra flavor. Kids love this version.
Gluten-Free Tiramisu
Use gluten-free ladyfingers. They can be a bit more fragile, so dip them even faster than usual. I’ve used Schär brand and they work well. Alternatively, you can use gluten-free sponge cake cut into strips.
Chocolate Lovers
Add a layer of chocolate pudding between the cream and the cookies. Or mix 2 tablespoons of cocoa powder into the mascarpone mixture. It turns it into a mocha tiramisu.
Strawberry Tiramisu
Swap the espresso for strawberry puree. Dip the ladyfingers in the puree and add fresh sliced strawberries between the layers. It’s a summer twist on the classic.
Coconut Version
Replace the heavy cream with full-fat coconut cream (the solid part from a can of coconut milk). Use coconut extract instead of vanilla. It’s dairy-free and tastes tropical.
Serving & Storage
I usually serve this straight from the fridge. It’s best cold, so the textures are firm and clean. Here’s how to store it:
Refrigerator:
Cover tightly with plastic wrap. It will last for up to 4 days in the fridge. The flavors get stronger over time, so day 2 is often better than day 1.
Freezing:
I don’t recommend freezing this. The whipped cream can separate when thawed, and the ladyfingers can become weirdly textured. It’s best fresh.
Reheating:
Don’t reheat it. Eat it cold. If you need to soften the cream a bit, just let it sit at room temperature for 10 minutes before serving.
Side Dishes:
This is rich enough to stand alone. You don’t need anything else. But if you want a drink pairing, a small cup of espresso or a glass of sweet dessert wine is perfect.
Nutrition Information
I’m not a nutritionist, but here’s the breakdown if you’re tracking. This is definitely a treat, not a health food.
Per serving (based on 8 servings):
- Calories: 380
- Protein: 6g
- Carbs: 35g
- Fiber: 1g
- Sugar: 22g
- Fat: 24g
What’s good: It’s a decent source of calcium from the mascarpone. What to know: It’s high in sugar and saturated fat because of the cream and cookies. But honestly? It’s worth it. I make it in moderation and enjoy every bite.
Final Thoughts
So that’s my go-to no-bake tiramisu with mascarpone and espresso layers. I’ve probably talked your ear off at this point, but when you make a recipe this often, you have a lot to say about it.
This has saved weeknight dinners more times than I can count. It’s my answer to “what’s for dessert” when I’m tired, don’t want to bake, and still want something that tastes really good. My kids are happy, my husband’s happy, and I’m happy because I’m not stressed about cooking.
Make it yours! Try different liquors, swap in your favorite chocolate, adjust the sweetness to your taste. The best recipes are the ones you adapt to your family’s tastes.
If you make this, drop a comment and let me know what you think! I love hearing how recipes turn out in your kitchen. And if something doesn’t work, tell me that too—I’m here to help troubleshoot.
Happy cooking! And I hope your kitchen smells half as good as mine does right now.
Frequently Asked Questions
Can I use instant coffee instead of brewed espresso?
Yes, you can. Dissolve 2-3 tablespoons of instant espresso powder in 2 cups of hot water. Let it cool completely before using. It won’t be as complex in flavor as fresh brewed, but it works in a pinch. I use this method when I’m traveling or don’t have a coffee maker.
Why did my tiramisu turn out runny?
This usually happens if the cream wasn’t whipped stiff enough, or if you soaked the ladyfingers too long. Make sure you whip the cream to stiff peaks, and don’t let the mascarpone mixture sit out too long before assembling. If it’s already runny, put it in the fridge for a few hours to firm up.
Can I make this ahead for a dinner party?
Absolutely. This is actually better made ahead. I recommend making it the night before. The flavors meld together overnight, and the cookies soften perfectly. It’s less stressful to have it ready than to assemble it right before guests arrive.
What if I don’t have ladyfingers?
You can use sponge cake cut into strips, or even savoiardi cookies (which are the same thing, just different names). If you’re out of cookies entirely, you can use graham crackers, but the texture will be different. They’re denser and sweeter.
Can I use cream cheese instead of mascarpone?
I don’t recommend it. Cream cheese is tangier and firmer. Mascarpone is milder and creamier. If you must substitute, mix the cream cheese with a little heavy cream to soften it, but the taste won’t be authentic. Stick with mascarpone if you can find it.
How do I store leftovers?
Store in an airtight container in the fridge for up to 4 days. The cream may firm up in the fridge, so let it sit at room temperature for 10 minutes before serving. It will still taste great.
Pin This Recipe!


No-Bake Tiramisu: Easy 5-Step Weeknight Dessert
- Total Time: 30 minutes active plus chilling time
- Yield: 8 servings 1x
Description
A quick, no-bake tiramisu that requires no raw eggs and minimal prep time, making it perfect for busy weeknights or last-minute entertaining. It features layers of espresso-soaked ladyfingers and a light mascarpone cream.
Ingredients
- 2 cups (480ml) strong brewed coffee or espresso, cooled
- 2 tablespoons (25g) sugar
- 2–3 tablespoons (30-45ml) strong liquor (optional, e.g., Marsala, rum)
- 16 oz (450g) mascarpone cheese, cold
- 2 cups (480ml) heavy whipping cream, cold
- ½ cup (60g) confectioners’ sugar
- 1 teaspoon vanilla extract
- 1 package (24-30 pieces) ladyfingers
- 2 oz (55g) dark chocolate (at least 60% cocoa), for grating
Instructions
- Brew the espresso and stir in sugar and optional liquor. Let cool to room temperature.
- In a large, cold bowl, whip the heavy cream on medium-high speed until stiff peaks form.
- In a separate bowl, whip mascarpone, confectioners’ sugar, and vanilla on low speed until smooth and combined.
- Gently fold the whipped cream into the mascarpone mixture until uniform and fluffy, being careful not to deflate the cream.
- Quickly dip ladyfingers into the espresso mixture (1-2 seconds per side) and place in the bottom of a serving dish.
- Spread a layer of mascarpone cream over the ladyfingers. Repeat to create two layers of cookies and two layers of cream.
- Cover and refrigerate for at least 4 hours or overnight.
- Before serving, grate dark chocolate over the top.
Notes
Do not soak the ladyfingers for more than 2 seconds or they will disintegrate. Keep mascarpone and cream cold for best whipping results. This dessert is best made ahead to allow flavors to meld. Do not freeze as the texture may suffer.
- Prep Time: 15 minutes
- Cook Time: 0 minutes
- Category: Dessert
- Cuisine: Italian
Nutrition
- Serving Size: 1 serving
- Calories: 380
- Sugar: 22
- Sodium: 45
- Fat: 24
- Saturated Fat: 14
- Carbohydrates: 35
- Fiber: 1
- Protein: 6
Keywords: no-bake tiramisu, weeknight dessert, easy tiramisu, mascarpone cream, espresso dessert, gluten-free option, make-ahead dessert