It was 6:45 AM on a Tuesday. The house was quiet, which usually means someone is in trouble, or just that the chaos hasn’t started yet. I was standing in my kitchen in pajamas, holding a tortilla like it owed me money, trying to remember if I’d actually planned breakfast or if I was just winging it again. My kids were already half-dressed, backpacks on, looking at me with that specific mix of hope and exhaustion that only exists before the school bell rings.
I had a half-chicken in the fridge from Sunday’s dinner, a head of romaine that was starting to look a little sad, and a bottle of Caesar dressing that was definitely past its “best by” date but still smelled fine. That’s when it hit me. Why was I making cereal? Why was I buying overpriced sandwiches at the corner store when I could have made something better, cheaper, and actually enjoyable for my kids? And for me, if I was honest.
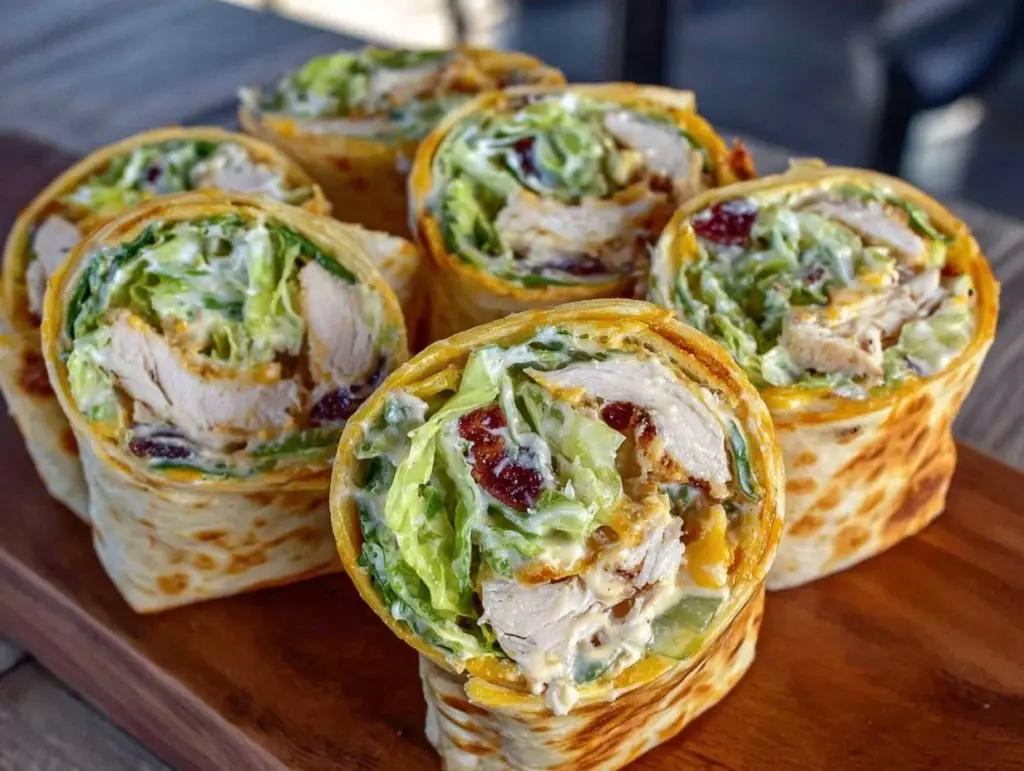
That morning, I threw together what I now call the Back to School Chicken Caesar Wrap. It wasn’t fancy. It didn’t require a trip to the store. But when I handed it to my daughter, she took one bite and actually stopped scrolling on her phone to look at me. That’s the moment I knew this was the answer to our morning rush. This wrap has become the backbone of our weeknight dinners and our school lunchboxes. It’s cheap, it’s filling, and it uses up leftovers in a way that feels like a treat rather than a compromise.
If you’re drowning in the back-to-school routine, tired of the same PB&J loop, or just looking for a way to stretch your grocery budget without sacrificing taste, you need to make this. I’ve tested this wrap with everything from rotisserie chicken to grilled chicken breast, and the result is always the same: empty wrappers and happy bellies.
Why You’ll Love This Recipe
I’ve been packing lunches for three kids for five years now, and I’ve learned that the key to success is simplicity. If it takes more than ten minutes to assemble, it’s not happening. Here’s why this chicken Caesar wrap has earned a permanent spot in our rotation:
Stupid Simple Assembly — Seriously, if you can spread mayo, you can make this. I don’t even cook the chicken from scratch anymore; I use leftovers. It’s just layering. Layer, roll, slice, go. My 10-year-old can make this on weekends when I’m still asleep.
Pantry-Friendly Ingredients — You probably have most of this already. Tortillas, chicken, lettuce, parmesan, and dressing. I keep a stash of large flour tortillas in the cupboard specifically for these. If you’re low on lettuce, iceberg works just as well as romaine for crunch.
Leftover Rescue Mission — This is my favorite way to use up leftover roast chicken, grilled chicken from a BBQ (like my spicy chipotle corn on the cob party leftovers), or even rotisserie chicken. It transforms “dinner scraps” into a fresh, exciting meal. It’s basically magic.
Budget-Smart — Making this at home costs about $1.50 to $2 per wrap, depending on your chicken prices. Buying a similar wrap at a gas station or cafe? That’s $6 to $8. Over a month, that’s a huge difference. My kids get the same protein and crunch without the markup.
Customizable for Picky Eaters — Not everyone wants the same thing. I let my kids build their own. One wants extra cheese, one wants it plain, one wants it with hot sauce. It’s a buffet of one, and everyone gets what they want.
This wrap is my go-to when I need dinner to just work. It’s reliable, it’s cheap, and it makes everyone happy. No complicated techniques, no weird ingredients, just good food.
Ingredients You’ll Need
Here’s the best part: this recipe is incredibly forgiving. I’m particular about the chicken, but the rest is pretty flexible. Here’s what you need and why it matters.
Chicken Breast or Thighs (1.5 lbs / 680g) — I prefer boneless, skinless chicken breasts because they’re lean and easy to slice, but thighs are juicier and often cheaper. If you’re using leftover rotisserie chicken, you’ll need about 3 cups of shredded meat. Pro tip: Cook a batch on Sunday night to use all week. It’s worth the extra 20 minutes of active time.
Large Flour Tortillas (6 large / 12-inch) — You need size here. Small tortillas will burst. I buy the big family-sized flour tortillas. They’re soft, pliable, and hold up well to the moist filling. If you’re doing gluten-free, corn tortillas are too brittle for this, so stick to a good GF flour blend.
Romaine Lettuce (1 large head, chopped) — Romaine has that perfect snap. Iceberg works too if you prefer a milder crunch. Avoid leaf lettuce; it gets soggy fast. Wash and dry it thoroughly. Wet lettuce is the enemy of a good wrap.
Caesar Dressing (½ cup / 120ml) — I’m not going to lie, I use store-bought for convenience. Kraft or Hidden Valley works fine. But if you want to level up, try a homemade version. I love the tang in creamy cajun sausage pasta sauce, and a similar garlic-parmesan vibe works here. Just use enough to coat, not drown.
Parmesan Cheese (½ cup / 50g, grated) — Freshly grated is best. It melts slightly into the warm chicken if you use warm chicken. Pre-grated stuff has that waxy coating and doesn’t taste as good. Buy a wedge and grate it yourself. It takes 30 seconds.
Garlic Powder (1 teaspoon) — I add this to the chicken while it cooks. It boosts the flavor without adding extra work. Fresh garlic can burn in a skillet, so powder is safer and easier for weeknights.
Black Pepper (½ teaspoon) — Freshly cracked is nice, but pre-ground is fine here. Don’t skip it; it balances the creamy dressing.
Optional Add-ins:
Croutons (½ cup) — For texture. I skip these if I’m packing for lunch because they get soggy, but they’re great for eating at the table.
Bacon Bits (¼ cup) — My husband loves this with bacon. It’s basically a BLT-ified Caesar.
Hot Sauce — A few dashes for a kick. My teenager insists on this.
Shopping Shortcuts: Buy pre-shredded chicken if you’re in a true pinch, but it’s usually drier. I buy the rotisserie chicken from the grocery store ($4) and shred it myself. It’s cheaper than buying pre-shredded and tastes better.
Equipment Needed
You don’t need fancy gadgets for this. Here’s what I actually use:
Large Skillet — 12-inch cast iron or non-stick. I prefer non-stick for easy cleanup since we’re using a little oil. It needs to be big enough to fit the chicken in a single layer.
Cutting Board — Any size works. I keep a dedicated board for chicken to avoid cross-contamination. Don’t be lazy about this; it’s a health thing.
Sharp Knife — For slicing the chicken. A dull knife will tear the meat and make it look messy. I have a cheap knife from the dollar store that’s surprisingly sharp, but a $20 chef’s knife is better.
Mixing Bowl — Medium size. To toss the chicken with the seasoning and dressing. A bowl is easier than doing it in the pan.
Measuring Spoons — For the garlic powder and pepper. You don’t need to be perfect, but having a baseline helps.
Rolling Pin (Optional) — I don’t use one, but if your tortillas are stiff from the fridge, you can gently roll them to soften them up. Usually, just letting them sit on the counter for 5 minutes works.
How to Make It: Step-by-Step

Alright, let’s make this! I’m walking you through exactly how I do it, including the little tricks I’ve picked up to keep it from falling apart.
Step 1: Cook and Season the Chicken (10-12 minutes)
If you’re using raw chicken, pat it dry with paper towels. This is crucial. Wet chicken steams instead of sears. Heat 1 tablespoon of oil in your skillet over medium-high heat. Season the chicken breasts with salt, pepper, and garlic powder. Lay them in the pan. Don’t crowd them. Cook for 5-6 minutes per side until golden brown and cooked through (165°F internal temp). If you’re using rotisserie chicken, skip this step and just shred it.
Step 2: Prep the Filling (5 minutes)
While the chicken cooks, wash and dry your lettuce. Chop it into bite-sized pieces. If you’re using raw chicken, let it rest for 5 minutes after cooking, then slice it against the grain. Slicing against the grain makes the chicken tender and easier to eat in a wrap. Toss the sliced chicken with the Caesar dressing in a bowl. You want it coated, but not swimming in dressing. Add the parmesan cheese and toss again.
Step 3: Warm the Tortillas (1 minute)
This is the secret weapon. Cold, stiff tortillas tear. Warm, pliable ones roll. Heat a dry skillet over medium heat for 30 seconds. Lay a tortilla in the pan for 15 seconds on each side. It should be warm and soft. Do this for all tortillas. You can also microwave them wrapped in a damp paper towel for 15 seconds. I prefer the skillet method because it adds a tiny bit of toasted flavor.
Step 4: Assemble the Wrap
Lay a warm tortilla flat. Spread a generous layer of the dressed chicken mixture down the center, leaving a 2-inch border on the sides and bottom. Add a handful of chopped romaine lettuce on top. If you’re adding croutons or bacon, add them now. Don’t overstuff it. A good rule of thumb: if you can’t fold the sides over without spilling, you’ve put too much in.
Step 5: Roll It Up
Fold the bottom edge up over the filling. Fold the left and right sides in. Roll it up tightly away from you. It should be snug. If it’s loose, it’ll fall apart in the lunchbox. If it’s too tight, it’ll burst. Find that sweet spot.
Step 6: Slice and Serve
Use a sharp knife to slice the wrap in half diagonally. This makes it easier to eat and shows off the layers. Serve immediately. If packing for lunch, let it cool completely before wrapping it in foil or putting it in a container. Steam creates condensation, which makes the tortilla soggy.
Total Time: About 20 minutes (10 minutes active, 10 minutes mostly hands-off cooking)
Expert Tips & Tricks
Here’s everything I’ve learned from making these wraps dozens of times. These tips will save you from my mistakes.
Don’t Skip the Drying Step
I can’t stress this enough. Wet lettuce + wet chicken = soggy wrap. Use a salad spinner or pat everything dry with paper towels. If your lettuce is wet, spread it on a towel for 5 minutes. It’s worth the extra minute.
Use Warm Tortillas
Cold tortillas crack. Warm tortillas bend. If you’re making these ahead, keep them in a warm oven (200°F) until you’re ready to roll. I’ve learned this the hard way with a broken wrap that spilled chicken all over my counter.
Control the Dressing
Caesar dressing is heavy. If you use too much, the wrap gets heavy and leaks. Start with ¼ cup per wrap and add more if needed. You can always add more at the table.
Make-Ahead Strategy
You can prep the chicken and lettuce up to 2 days in advance. Store them in separate airtight containers in the fridge. Assemble the wraps the night before or the morning of. They hold up well for up to 24 hours if wrapped tightly in foil.
Freezing Warning
Do not freeze these wraps. The lettuce will turn to mush, and the tortilla will become gummy. Make them fresh. If you need to freeze, freeze the cooked chicken separately.
Variations & Substitutions
Once you’ve nailed the basic version, here’s how you can mix it up. I’ve tried all of these.
Spicy Caesar Wrap
Add a diced jalapeño or a dash of cayenne pepper to the chicken. Or mix hot sauce into the dressing. My kids love the kick.
Avocado Caesar Wrap
Add sliced avocado for creaminess. It’s like a Caesar salad meets a California roll. Great for healthy fats.
Veggie-Loaded
Add sliced cucumbers, cherry tomatoes, or red onion. It adds crunch and freshness. This is how I get my kids to eat more veggies.
Italian Style
Swap Caesar dressing for Italian dressing and add mozzarella cheese. It’s basically a caprese wrap.
Gluten-Free
Use large gluten-free tortillas. They can be trickier to roll, so be gentle. I use the rice-based ones; they’re more pliable.
Dairy-Free
Use a dairy-free Caesar dressing (many brands have vegan versions) and skip the parmesan or use nutritional yeast. It’s still tasty.
Protein Swap
You can use grilled shrimp, turkey, or even chickpeas. Chickpeas make it a vegetarian option. I’ve used chickpea curry leftovers in wraps before, and it was surprisingly good.
Serving & Storage
How to Serve:
I usually serve these straight from the counter. They’re casual and easy. But here are other ways I’ve enjoyed them:
Side Dishes:
– Apple slices
– Carrot sticks with ranch
– A small bag of chips
– A piece of fruit
Packing for Lunch:
Wrap the assembled wrap tightly in aluminum foil. This keeps it together and makes it easier to eat. You can also use wax paper, but foil holds better. Put it in a lunchbox with an ice pack. It will stay fresh until lunchtime.
Storage Instructions:
Refrigerator:
Store assembled wraps in an airtight container or wrapped in foil for up to 2 days. The tortilla will soften slightly, but it’s still good.
Reheating:
I don’t recommend reheating these. They’re best cold or room temperature. If you must reheat, microwave for 15-20 seconds to warm the chicken, but the lettuce will wilt.
Freezing:
As mentioned, don’t freeze. The texture suffers too much.
Nutrition Information
I’m not a nutritionist, but here’s the breakdown if you’re tracking. This is per wrap, based on 6 servings.
– Calories: 450
– Protein: 30g
– Carbs: 40g
– Fiber: 3g
– Sugar: 4g
– Fat: 18g
– Saturated Fat: 4g
– Cholesterol: 65mg
– Sodium: 600mg
– Calcium: 150mg
What’s Good:
– High protein from chicken and cheese
– Decent fiber from lettuce and tortilla
– Can be adjusted for lower sodium by using low-sodium dressing
What to Know:
– Higher in calories from dressing and cheese
– Contains gluten and dairy
– Moderate sodium (use low-sodium broth and dressing to reduce)
My Take:
Look, this is a comfort food wrap. It’s not a diet recipe. But it’s way better than fast food, costs less, and I know exactly what’s in it. When I want to make it lighter, I use less dressing and add more lettuce. But usually? I just eat a reasonable portion and enjoy it.
Final Thoughts
So that’s my go-to Back to School Chicken Caesar Wrap! I’ve probably talked your ear off at this point, but when you make a recipe this often, you have a lot to say about it. This has saved our mornings more times than I can count. It’s my answer to “what’s for lunch?” when I’m tired, don’t want to cook a full meal, and still want something that tastes really good. My kids are happy, I’m happy because I’m not stressed, and we’re all eating well.
Make it yours! Try different add-ins, swap in your favorite vegetables, adjust the dressing. The best recipes are the ones you adapt to your family’s tastes. If you make this, drop a comment and let me know what you think! I love hearing how recipes turn out in your kitchen. And if something doesn’t work, tell me that too—I’m here to help troubleshoot.
Happy cooking! And I hope your kitchen smells half as good as mine does right now.
Frequently Asked Questions
Can I use leftover chicken from another recipe?
Absolutely! In fact, I recommend it. I often use leftover chicken tikka masala or grilled chicken from a BBQ. Just make sure it’s cooled down before assembling. If the chicken is warm, it might wilt the lettuce. Shred or slice it and toss with the dressing.
Why did my wrap fall apart?
Usually, it’s because the tortilla was too cold or you overstuffed it. Always warm the tortilla first. Also, don’t put too much filling. Less is more. If it’s still falling apart, try wrapping it in foil tightly. The foil will hold it together.
Can I make these ahead for the week?
You can make them up to 24 hours in advance. After that, the tortilla gets too soft and soggy. I recommend assembling them the night before or the morning of. If you need to prep for the whole week, prep the chicken and lettuce separately, and assemble fresh each day.
Is there a dairy-free option?
Yes! Use a dairy-free Caesar dressing (many brands have vegan versions) and skip the parmesan or use nutritional yeast. It’s still tasty and creamy. I’ve made this for my lactose-intolerant friend, and she loved it.
How do I reheat leftovers?
I don’t recommend reheating these. They’re best cold or room temperature. If you must reheat, microwave for 15-20 seconds to warm the chicken, but the lettuce will wilt. It’s still edible, just not ideal.
Can I freeze these wraps?
No. The lettuce will turn to mush, and the tortilla will become gummy. Make them fresh. If you need to freeze, freeze the cooked chicken separately.
What if I don’t have Caesar dressing?
You can make a quick version with mayo, lemon juice, garlic, parmesan, and a dash of anchovy paste (or Worcestershire sauce). Or use Italian dressing with extra parmesan. It won’t be exactly Caesar, but it’ll still be delicious.
Pin This Recipe!


Back to School Chicken Caesar Wrap: Easy Budget Lunch
- Total Time: 20 minutes
- Yield: 6 servings 1x
Description
A quick, budget-friendly, and customizable chicken Caesar wrap that uses leftover chicken and pantry staples, perfect for busy school mornings or weeknight dinners.
Ingredients
- 1.5 lbs boneless, skinless chicken breasts or thighs (or 3 cups shredded rotisserie chicken)
- 6 large flour tortillas (12-inch)
- 1 large head romaine lettuce, chopped and dried thoroughly
- ½ cup Caesar dressing
- ½ cup grated parmesan cheese
- 1 teaspoon garlic powder
- ½ teaspoon black pepper
- 1 tablespoon oil (for cooking raw chicken)
- Salt (to taste)
- Optional: ½ cup croutons, ¼ cup bacon bits, hot sauce
Instructions
- If using raw chicken, pat dry and season with salt, pepper, and garlic powder. Heat oil in a large skillet over medium-high heat and cook chicken for 5-6 minutes per side until golden brown and internal temperature reaches 165°F. Let rest for 5 minutes, then slice against the grain. If using rotisserie chicken, skip to step 2.
- Wash and thoroughly dry the romaine lettuce, then chop into bite-sized pieces.
- In a mixing bowl, toss the sliced or shredded chicken with Caesar dressing until coated but not swimming. Add parmesan cheese and toss again.
- Warm tortillas in a dry skillet for 15 seconds per side or microwave wrapped in a damp paper towel for 15 seconds to make them pliable.
- Lay a warm tortilla flat. Spread a generous layer of the dressed chicken mixture down the center, leaving a 2-inch border on the sides and bottom.
- Add a handful of chopped romaine lettuce on top of the chicken. Add optional croutons or bacon if desired.
- Fold the bottom edge up over the filling, then fold the left and right sides in. Roll tightly away from you.
- Slice the wrap in half diagonally with a sharp knife. Serve immediately or wrap tightly in foil for packing.
Notes
Ensure lettuce and chicken are dry to prevent soggy wraps. Warm tortillas before rolling to prevent tearing. Do not freeze these wraps as the lettuce will turn to mush. Can be made ahead and stored in the fridge for up to 2 days if assembled the night before.
- Prep Time: 10 minutes
- Cook Time: 10 minutes
- Category: Lunch
- Cuisine: American
Nutrition
- Serving Size: 1 wrap
- Calories: 450
- Sugar: 4
- Sodium: 600
- Fat: 18
- Saturated Fat: 4
- Carbohydrates: 40
- Fiber: 3
- Protein: 30
Keywords: chicken caesar wrap, back to school lunch, budget lunch, easy dinner, leftover chicken recipes, quick lunch ideas, family friendly meals



