I still remember the specific Tuesday morning in September three years ago when I almost lost my mind. My son was already ten minutes late for the bus because I couldn’t find his other left shoe, my daughter was crying over a spilled juice box, and I had exactly zero time to make a proper breakfast. I grabbed a banana, threw some flour in a bowl, and microwaved a mug because I was desperate. It was edible, sure, but it wasn’t what I wanted them to eat on a daily basis. I wanted something that felt like a treat but was actually nutritious enough to fuel a growing kid through first period math.
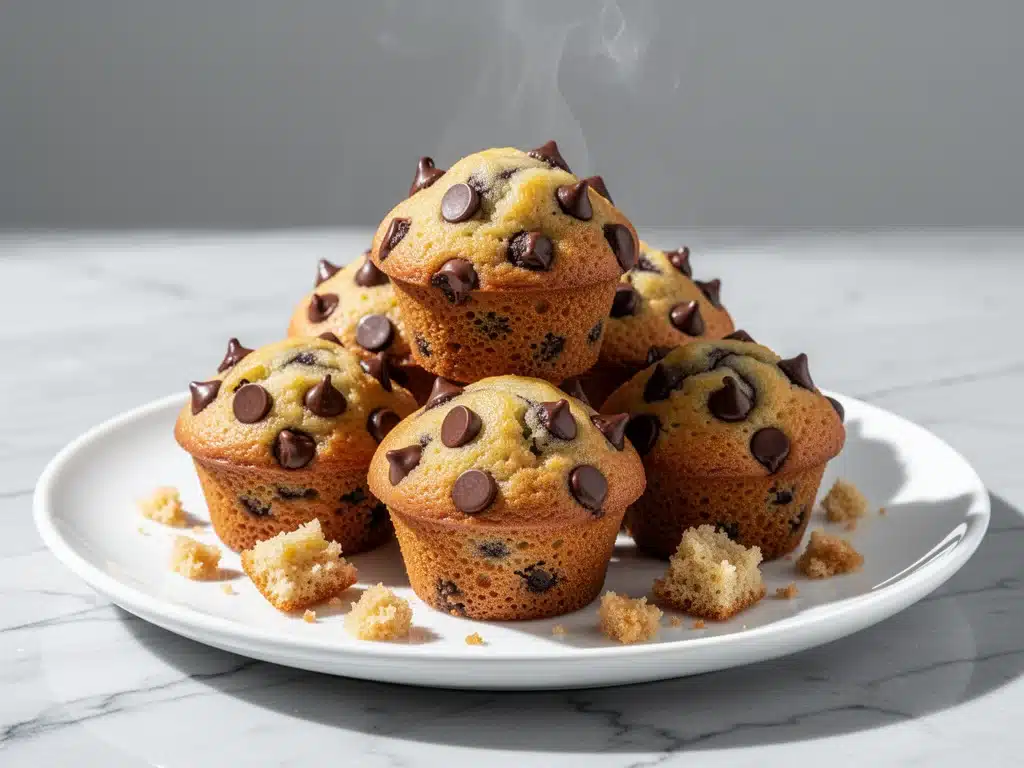
That failed mug cake experiment led me to obsess over the perfect bite-sized breakfast. I wanted something you could grab on the way out the door. Something that didn’t taste like cardboard. Something that wouldn’t make my kids complain about “school food.” That obsession resulted in these mini banana muffin bites. They are my holy grail for back-to-school mornings. They are soft, naturally sweetened, packed with potassium, and small enough to fit in a tiny hand or a small lunchbox.
Here’s the thing about these muffin bites—they aren’t just a snack. They are a survival tool for parents. I’ve made them for carpool lines, for early morning practice runs, and for those chaotic mornings when we’re running on fumes. They freeze beautifully, so I make a double batch every Sunday. By Wednesday, they’re still soft and ready to go. If you’re drowning in the back-to-school rush, you need this recipe in your life. It’s simple, it’s forgiving, and it tastes like a warm hug in a tiny package.
Why You’ll Love These Mini Banana Muffin Bites
I’ve tested probably fifteen different versions of mini banana muffins over the last two years. Some were too dense, some were too sweet, and some just fell apart in the lunchbox. These mini banana muffin bites are the winner. They hit that perfect balance of moist and fluffy without requiring any fancy ingredients or hours of prep time. Here’s why they’ve earned a permanent spot in our weekly rotation:
- Grab-and-Go Convenience — Seriously, this is the main selling point. I pop them into a container and hand them to my kids as they run out the door. No utensils needed. No mess. They eat them in the car while buckling in. It’s a parent’s dream.
- Actually Healthy — I’m not talking diet food here. I’m talking real food. These use ripe bananas for sweetness, so I don’t need to drown them in sugar. I add a little whole wheat flour and oats for fiber. They keep my kids full until snack time, which means no hangry meltdowns at 10:30 AM.
- Freezer Friendly — This is the game-changer. I make a batch on Sunday, freeze them, and pull them out the night before. They thaw out perfectly by morning. I never have to worry about “what’s for breakfast” because these are always in the freezer.
- Kid-Tested Approval — My picky eater son, who usually refuses anything yellow (bananas included, apparently), devours these. He thinks they are “banana cookies.” If he likes it, I know it’s good. My daughter asks for them for lunch almost every day.
- Quick Prep Time — You don’t need to stand in the kitchen for twenty minutes. It takes about 10 minutes to mix the batter and another 15 minutes to bake. That’s it. You can make these while your kids are getting dressed.
Real talk: these muffin bites have reduced my morning stress levels by about 80%. When you have a recipe that just works, every single time, it changes the tone of your whole morning. You’re not rushing around trying to cook; you’re just grabbing and going. That’s the kind of back-to-school breakfast I’m talking about.
Ingredients You’ll Need
Here’s the best part: you probably have most of these ingredients already. This isn’t a recipe that requires a special trip to the grocery store for obscure items. It’s pantry-friendly and uses stuff you likely already have. I’m particular about a few things here, so pay attention to the notes.
For the Base
Ripe Bananas (3 medium / about 1.5 cups mashed) — This is non-negotiable. Use bananas that are spotted brown or even black. The riper they are, the sweeter they are, and the more intense the banana flavor. I don’t add much sugar because the bananas do the heavy lifting. If your bananas are green, they won’t be sweet enough, and you’ll need to add extra sugar.
Whole Wheat Flour (1.5 cups / 190g) — I use whole wheat for the extra fiber, which keeps my kids full longer. All-purpose flour works too if you want lighter muffins, but I prefer the heartiness of whole wheat. If you’re gluten-free, you can use a 1-to-1 gluten-free flour blend, though the texture might be slightly denser.
Oats (½ cup / 40g) — I use old-fashioned rolled oats. You can pulse them in a blender to make oat flour if you want a finer texture, but I like having a little chew in my muffins. It adds a nice rustic feel.
Eggs (2 large / about 100g) — Room temperature eggs mix better into the batter. I usually take them out of the fridge while the oven preheats. They bind everything together.
Neutral Oil (¼ cup / 60ml) — I use vegetable oil or canola oil. You can use melted coconut oil if you prefer, but avoid olive oil unless you want your muffins to taste like salad. The oil keeps them moist.
For the Flavor

Brown Sugar (¼ cup / 50g) — I use light brown sugar for a hint of molasses flavor. It’s less sweet than white sugar, which is perfect since we have bananas. You can use white sugar if that’s all you have, but brown is better.
Vanilla Extract (1 teaspoon / 5ml) — Pure vanilla makes a huge difference. I don’t bother with imitation stuff for baking. It adds that warm, bakery-like aroma.
Cinnamon (1 teaspoon / 2g) — Don’t skip this. Cinnamon and banana are best friends. It adds warmth and depth. If you’re sensitive to spices, you can reduce it to ½ teaspoon.
Baking Soda (1 teaspoon / 5g) — This helps the muffins rise. Make sure it’s not expired! I keep mine in the fridge to check freshness, but for this recipe, fresh baking soda is key.
Salt (½ teaspoon / 3g) — Just a pinch to balance the sweetness. It makes the banana flavor pop.
Optional Add-ins
Chopped Walnuts (¼ cup / 30g) — I add these for crunch. My husband loves them. If your kids are allergic or picky, skip them. The muffins are great without.
Dark Chocolate Chips (¼ cup / 40g) — These turn the muffins into a dessert-like treat. I use mini chocolate chips so they distribute evenly. It’s a great way to sneak in a little extra joy.
Chia Seeds (1 tablespoon / 10g) — I toss these in for extra omega-3s. They’re tiny and invisible, so my kids don’t notice. It’s a sneaky health boost.
Equipment Needed
You don’t need fancy equipment for this. Here’s what I actually use in my kitchen. If you don’t have these exact items, don’t worry—there are easy swaps.
Muffin Tin — I use a standard 12-cup muffin tin. For these mini bites, I actually use a mini muffin tin (24 cups). If you don’t have a mini tin, you can use a regular tin but reduce the baking time by about 5 minutes. I love the mini tins because they create the perfect bite-sized portion.
Mixing Bowls — One large bowl for the wet ingredients and one medium for the dry. I usually just use one large bowl and do it all in there to save on dishes. My philosophy is: less cleanup = more happy parents.
Fork or Potato Masher — For mashing the bananas. I prefer a masher because it gets them smoother, but a fork works fine if that’s all you have.
Measuring Cups and Spoons — Standard stuff. Dollar store versions work fine. Just make sure they’re accurate.
Paper Liners — I use mini paper liners for the mini muffin tin. They make cleanup super easy and prevent sticking. I’ve tried greasing the tin without liners, but the muffins stick sometimes. Liners are worth the extra penny.
Freezer-Safe Containers — For storing the baked muffins. I use airtight plastic containers or heavy-duty freezer bags. I label them with the date so I know how old they are.
Wire Rack — To cool the muffins on. If you don’t have one, just leave them in the tin for 5 minutes and then transfer to a plate. They cool fast because they’re small.
How to Make It: Step-by-Step
Alright, let’s make these! I’m walking you through exactly how I do it, including the little tricks I’ve picked up over dozens of batches. This is straightforward, but a few details matter.
Step 1: Prep Your Pan and Oven (5 minutes)
Preheat your oven to 350°F (175°C). This is crucial. If the oven isn’t hot enough, the muffins won’t rise properly. Line your mini muffin tin with paper liners. I spray the liners lightly with cooking spray just to be safe, though the liners usually do the job. While the oven heats up, grab your bananas.
Step 2: Mash the Bananas (2 minutes)
Peel your ripe bananas and put them in a large mixing bowl. Mash them with a fork or potato masher until they are mostly smooth with a few small lumps. I like a few lumps for texture. You should have about 1.5 cups of mashed banana. If you don’t have enough ripe bananas, you can use frozen bananas (thawed and drained), but fresh tastes best.
Step 3: Mix Wet Ingredients (3 minutes)
To the mashed bananas, add the eggs, brown sugar, oil, and vanilla extract. Whisk everything together until it’s well combined. The mixture should look glossy and smooth. This step incorporates the sweetness and moisture evenly. Don’t rush this—if the sugar isn’t fully dissolved, your muffins might be grainy.
Step 4: Combine Dry Ingredients (2 minutes)
In a separate bowl (or directly into the wet mix if you’re lazy, which I often am), whisk together the flour, oats, baking soda, cinnamon, and salt. Make sure there are no clumps of baking soda. If you’re adding nuts or chocolate chips, stir them in now. I usually fold them in gently at the end to distribute them evenly.
Step 5: Combine Wet and Dry (2 minutes)
Pour the dry ingredients into the wet ingredients. Stir gently with a spatula or wooden spoon until just combined. Important: Do not overmix. Overmixing makes the muffins tough. It’s okay if there are a few streaks of flour left. The batter will be thick and sticky. This is normal. If you want a sweeter muffin, you can add a little more sugar here, but I find the banana sweetness is usually enough.
Step 6: Fill the Muffin Tin (3 minutes)
Use a cookie scoop or a spoon to divide the batter into the mini muffin cups. Fill each cup about ¾ full. If you overfill them, they’ll spill over and make a mess. I usually get about 20-24 mini muffins from this recipe. If you’re using a regular muffin tin, fill each cup about ½ full and bake for 15-18 minutes.
Step 7: Bake (12-15 minutes)
Place the tin in the preheated oven. Bake for 12-15 minutes for mini muffins, or 15-18 minutes for regular muffins. They are done when the tops are golden brown and a toothpick inserted into the center comes out clean or with just a few moist crumbs. Don’t overbake them, or they’ll be dry. I usually check them at 12 minutes.
Step 8: Cool and Store (10 minutes)
Let the muffins cool in the tin for 5 minutes, then transfer them to a wire rack to cool completely. This prevents them from getting soggy from steam. Once cool, you can eat them right away or store them. If you’re freezing them, wait until they are completely cool before putting them in containers. Warm muffins in a container will create condensation and make them icy.
Expert Tips & Tricks
Here’s everything I’ve learned from making these mini banana muffin bites dozens of times. These tips will save you from my mistakes and ensure your muffins turn out perfect every time.
Use Very Ripe Bananas
This is the #1 tip. The riper the banana, the sweeter the muffin. If your bananas are still yellow with green tips, they won’t be sweet enough, and you’ll need to add extra sugar. I buy bananas when they are yellow and let them sit on the counter until they are brown and spotted. I even freeze ripe bananas for future baking. It’s a lifesaver.
Don’t Overmix the Batter
I know it’s tempting to mix everything until it’s smooth, but don’t do it. Overmixing develops gluten, which makes the muffins dense and tough. Mix until you *just* see no more streaks of flour. The batter will look lumpy. That’s a good thing.
Use a Cookie Scoop
For mini muffins, consistency is key. A cookie scoop ensures each muffin has the same amount of batter, so they bake evenly. If you use a spoon, you might end up with some huge muffins and some tiny ones. I use a small ice cream scoop—it’s cheap and works perfectly.
Freeze Them Properly
If you’re freezing these, let them cool completely first. Then, place them in a single layer on a baking sheet and freeze for 1 hour. This “flash freezing” prevents them from sticking together. After that, transfer them to a freezer bag or container. They’ll last for up to 3 months. This method keeps them fresh and prevents freezer burn.
Customize the Flavor
These muffins are a blank canvas. Add a teaspoon of lemon zest for brightness. Swap the cinnamon for nutmeg. Add a tablespoon of honey for extra sweetness. I’ve tried adding shredded coconut, and it’s delicious. Don’t be afraid to experiment once you’ve mastered the base recipe.
Variations & Substitutions
Once you’ve nailed the basic version, here’s how you can mix it up. I’ve tried all of these, and they all work well.
Gluten-Free Version
Simply swap the whole wheat flour for a 1-to-1 gluten-free flour blend. I’ve used Bob’s Red Mill and King Arthur, and both work great. The texture might be slightly more crumbly, but the flavor is the same. Add a teaspoon of xanthan gum if your flour blend doesn’t include it.
Dairy-Free Option
This recipe is naturally dairy-free if you use oil instead of butter. If you want to use butter, just make sure it’s dairy-free. The eggs are the only animal product, so if you need vegan muffins, you can use flax eggs (1 tablespoon ground flaxseed mixed with 3 tablespoons water per egg) instead of regular eggs. They bind well and add a slight nutty flavor.
Lower Sugar Version
If you’re watching sugar, you can skip the brown sugar entirely. The bananas provide plenty of sweetness. Just make sure they are very ripe. I do this for my youngest daughter who is sensitive to sugar spikes.
Protein-Packed Version
Add a scoop of vanilla protein powder to the dry ingredients. You might need to add a splash of milk or extra banana to balance the dryness. I use whey protein isolate, and it works well. It makes these muffins a great post-workout snack.
Apple Cinnamon Version
Swap the bananas for mashed applesauce (½ cup). Add an extra teaspoon of cinnamon and a pinch of nutmeg. It’s like an apple pie in muffin form. My kids love this variation.
Serving & Storage
These mini banana muffin bites are versatile. Here’s how I serve and store them.
How to Serve
I serve them warm for breakfast, often with a side of yogurt or fruit. They’re perfect for packing in lunchboxes—they don’t crumble easily. I also serve them at breakfast parties and potlucks. They disappear fast. If you want to make them feel fancier, drizzle them with a little honey or top them with a dollop of cream cheese.
Storage Instructions
Room Temperature: Store in an airtight container for up to 3 days. They stay moist and soft. I usually keep them on the counter for quick access.
Refrigerator: Store in an airtight container for up to 5 days. They might dry out slightly, so I prefer the counter for short-term storage.
Freezer: As mentioned, flash freeze them first, then store in a freezer bag for up to 3 months. They thaw quickly at room temperature or in the microwave for 30 seconds.
Reheating
Microwave for 20-30 seconds to warm them up. They taste best when slightly warm. If you’re in a rush, you can eat them cold—they’re still delicious. I often eat one cold on the way to the car.
Nutrition Information
I’m not a nutritionist, but here’s the breakdown if you’re tracking. This is per muffin (based on 24 mini muffins).
| Nutrient | Amount |
|---|---|
| Calories | 65 kcal |
| Protein | 1.5g |
| Carbs | 12g |
| Fiber | 1.5g |
| Sugar | 6g |
| Fat | 2g |
| Sodium | 80mg |
What’s Good: They’re naturally sweetened, have some fiber from the oats and whole wheat flour, and provide a good energy boost. What to Know: They contain gluten and eggs. If you’re gluten-free or vegan, use the substitutions mentioned above. They’re a great snack, but they’re not a complete meal on their own. Pair them with a protein source like yogurt or a glass of milk for a balanced breakfast.
Final Thoughts
So that’s my go-to mini banana muffin bites recipe! I’ve probably talked your ear off at this point, but when you make a recipe this often, you have a lot to say about it. These muffins have saved my mornings. They are my answer to “what’s for breakfast” when I’m tired, don’t want to cook, and still want my kids to eat something healthy.
Make them yours! Try different add-ins, swap in your favorite spices, or adjust the sweetness to your liking. The best recipes are the ones you adapt to your family’s tastes. I hope these become a staple in your kitchen too. If you make them, drop a comment and let me know what you think! I love hearing how recipes turn out in your kitchen. And if something doesn’t work, tell me that too—I’m here to help troubleshoot.
Happy baking! And I hope your kitchen smells half as good as mine does right now.
Frequently Asked Questions
Can I use frozen bananas instead of fresh?
Absolutely! Frozen bananas are actually great for baking because they’re often very ripe by the time you use them. Just thaw them completely and drain any excess liquid before mashing. The texture might be slightly wetter, so you may need to reduce the oil by a tablespoon or two. I use frozen bananas all the time when fresh ones aren’t ripe enough.
Why did my muffins turn out dry?
Usually, this means they were overbaked. Mini muffins bake very quickly, so check them at 12 minutes. If the toothpick comes out clean, they’re done. If it has wet batter, give them another minute. Another reason could be using under-ripe bananas. Make sure your bananas are brown and spotted for maximum moisture and sweetness.
Can I make these ahead of time?
Yes! In fact, they taste even better the next day as the flavors meld. You can make the batter the night before and store it in the fridge, then bake in the morning. Or, you can bake them ahead and freeze them. I prefer baking ahead and freezing because it’s less work in the morning. Just thaw them overnight in the fridge or for 30 minutes on the counter.
How do I store these muffins?
Store them in an airtight container at room temperature for up to 3 days. For longer storage, freeze them in a freezer-safe bag or container for up to 3 months. They freeze very well. I usually keep a batch in the freezer for emergencies and a batch on the counter for quick access.
Can I use honey or maple syrup instead of brown sugar?
You can, but the texture will be slightly different. Honey and maple syrup are liquid sweeteners, so you may need to reduce the oil slightly to balance the moisture. I usually swap ¼ cup brown sugar for 3 tablespoons of honey or maple syrup. The flavor will be more pronounced, which is nice if you like that taste.
Are these muffins suitable for school?
Yes! They are nut-free (if you don’t add nuts), which is important for many schools. They are also individually portioned, making them easy to pack. Just check your school’s policy on nuts, but the muffin batter itself is nut-free. I always double-check with my kids’ school rules before packing nut-containing items.
Can I double this recipe?
Definitely! Double everything and use two muffin tins. The baking time stays the same. I often double the recipe on weekends to have enough for the whole week. Just make sure you have enough space in your oven and freezer. They freeze in bulk very well.
Pin This Recipe!


Mini Banana Muffin Bites: Best Easy Back-to-School Breakfast
- Total Time: 25 minutes
- Yield: 24 servings 1x
Description
Soft, naturally sweetened mini banana muffin bites that are perfect for grab-and-go back-to-school breakfasts. They are freezer-friendly, kid-approved, and take only 10 minutes of prep time.
Ingredients
- 3 medium ripe bananas (about 1.5 cups mashed)
- 1.5 cups whole wheat flour (or all-purpose flour)
- ½ cup old-fashioned rolled oats
- 2 large eggs (room temperature)
- ¼ cup neutral oil (vegetable, canola, or melted coconut oil)
- ¼ cup light brown sugar
- 1 teaspoon vanilla extract
- 1 teaspoon cinnamon
- 1 teaspoon baking soda
- ½ teaspoon salt
- Optional: ¼ cup chopped walnuts, ¼ cup dark chocolate chips, or 1 tablespoon chia seeds
Instructions
- Preheat oven to 350°F (175°C). Line a mini muffin tin (24 cups) with paper liners.
- Mash the ripe bananas in a large mixing bowl until mostly smooth with a few small lumps.
- Add eggs, brown sugar, oil, and vanilla extract to the bananas. Whisk until well combined and glossy.
- In a separate bowl, whisk together flour, oats, baking soda, cinnamon, and salt.
- Pour dry ingredients into wet ingredients. Stir gently with a spatula until just combined; do not overmix.
- Fold in optional add-ins like nuts or chocolate chips if using.
- Divide batter into mini muffin cups, filling each about ¾ full.
- Bake for 12-15 minutes until tops are golden brown and a toothpick inserted comes out clean.
- Cool in the tin for 5 minutes, then transfer to a wire rack to cool completely before storing.
Notes
Use very ripe, spotted bananas for maximum sweetness and moisture. Do not overmix the batter to avoid tough muffins. For freezing, flash freeze muffins on a baking sheet for 1 hour before transferring to airtight containers to prevent sticking. These can be made gluten-free by using a 1-to-1 gluten-free flour blend.
- Prep Time: 10 minutes
- Cook Time: 15 minutes
- Category: Breakfast
- Cuisine: American
Nutrition
- Serving Size: 1 mini muffin
- Calories: 65
- Sugar: 6
- Sodium: 80
- Fat: 2
- Carbohydrates: 12
- Fiber: 1.5
- Protein: 1.5
Keywords: mini banana muffins, back-to-school breakfast, grab-and-go breakfast, healthy muffins, kid-friendly recipes, freezer-friendly breakfast, easy banana muffins